|
|
|||||||||||||||||
 Most of us familiar with the York air compressor would agree that an onboard air system is one of the most useful tools you can have on, and off, the trail. We also know the York's reputation to spit and sometimes spew oil into air tanks, tires, and air tools. Most of us familiar with the York air compressor would agree that an onboard air system is one of the most useful tools you can have on, and off, the trail. We also know the York's reputation to spit and sometimes spew oil into air tanks, tires, and air tools.
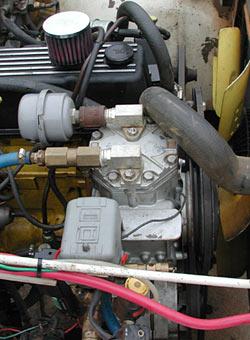
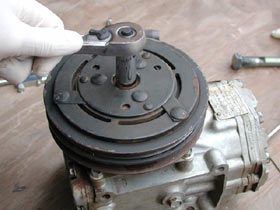
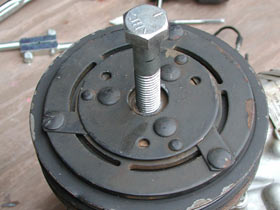
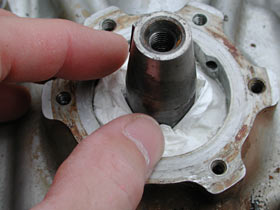
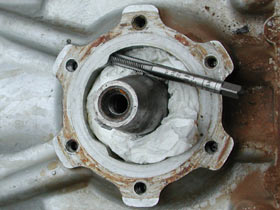
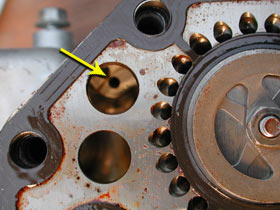
I came across some folks talking about a solution that is supposed to reduce the amount of oil spewing from the compressor by as much as 90%. They said that all I'd have to do is plug the lubricating hole located behind the clutch assembly. Sounds easy enough so I searched the net (although not very hard) but could not find a write-up. I thought, "what the heck...how hard can this be?" So what should one do when searching for a solution? Consult an expert. Right! So who is a better expert on Yorks and onboard air systems than Brad Kilby of Kilby Enterprises? There is none that I know of, so I emailed Brad and asked him what he thought about removing the clutch and plugging the lubricating hole. He wrote me back and said this would not completely eliminate oil blow-by, but there should be no problem. He did recommend that I vent the crank case to avoid blowing seals and o-rings. He also told me that my solution to plug the hole behind the clutch was definitely the hard way to do this modification. "The easy way is removing the head and jamming a sheet metal screw in the same hole just at other end of the passage." Now here is where we get to the part of this write-up where I stress the importance of learning from other peoples' mistakes. In this case, they were my own mistakes. There is an easy way to do this project and there is a hard way to do this project. Unfortunately, I did it the hard way. 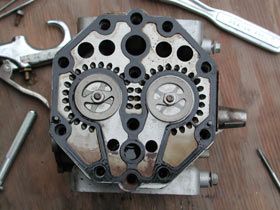 The Hard Way The Hard WaySince I could not find any photos on the web where this had been done before, I really did not know what I was looking for or where the passage was located other than somewhere behind the clutch. So I followed Brad's advise and went out to the Jeep and started pulling bolts off the cover of my York. When I finally got the top off what did I find but a plate that could not be removed (see photo). These holes were way too big to be plugged with a sheet metal screw the way Brad described. ** The photos at right shows the compressor already removed from the vehicle and the clutch removed. ** At this point, I was feeling a little clueless so I decide to put the head back on the York and remove it completely from the engine compartment. This was not a minor job. It was not that it was all that difficult, but it just takes time to remove the belts, hoses, clamps, bolts, etc. With the York out of the Jeep I removed the clutch. To do so you must first remove the bolt on the face of the clutch then insert and screw in a 5/8" x 11 thread bolt which effectively pushes the clutch right off the compressor. Then you can remove the four bolts holding the magnetic thingy (is that a technical term?) and finally remove the six bolts holding the seal around the clutch shaft.
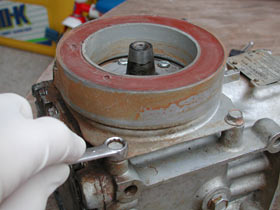
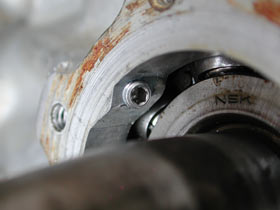
Once you have everything opened up you can actually see the lubricating hole. Pull out the seal resting on the bearing and stuff the space with paper, plastic, or whatever to prevent metal shavings from getting everywhere inside the compressor. I even put a little piece of paper in the lubricating hole. The hole is easily threaded with a #10-32 tap (no need to drill). Now blow all the metal shavings out and clean up the area. Remove the paper towels (or whatever you used), put some Loc-Tite on a #10-32 plug and screw it in.
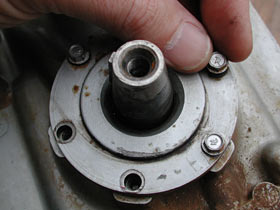
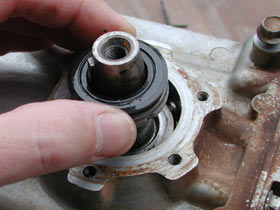
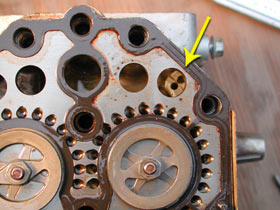
You are finished. Put everything back together in the reverse order and the job is complete. That was easy, right? The Easy WayHindsight is always 20/20. You better believe this is especially true in this case. Remember Brad's instructions, "The easy way is removing the head and jamming a sheet metal screw in the same hole just at other end of the passage." It was not until I had removed the clutch assembly and located the lubricating passage that I realized how easy this job really should have been. Remember those huge holes on top of the compressor once I removed the top? There was a hole that was way too big to plug with a sheet metal screw, right? The passage Brad was talking about is directly beneath one of these larger holes in the head. I never even thought to look a little bit deeper inside the head (please no comments. . . remember hindsight is 20/20).
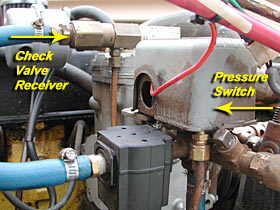
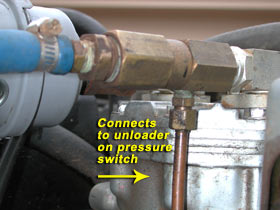
So the original instructions could not have been easier. Remove the top, jam a sheet metal screw in the hole, put the top back on and presto-chango, you are finished. I have included photos to make your job easier in locating the passage. In these photos it appears that there are two holes. In reality, there is only one but the reflective interior of the compressor make it look like there are two holes right next to each other. What an easy modification - 10 minutes at most - if you do it the easy way. Venting the Crank CaseI was not exactly sure how to do this so I emailed Brad again for more specifics (I wish I had done this when I was looking for the 'hole-in-the-head' of my compressor). He recommended experimenting with relief valves and rigging them to one of the screws on the side of the compressor. I already have an unloader installed between my check valve and the compressor and I thought this might take care of the problem without adding another relief valve/vent. With everything back together I turned on the compressor and filled my tank until the pressure switch cut it off automatically at 125 psi. On my pressure switch (Grainger part #5A020) there is a built-in unloader that releases all the pressure behind the check valve (Grainger part #4X828) when the switch cuts off the compressor. Once my tank was filled and the unloader blew the excess pressure I slowly unscrewed the bolt on the side of the compressor. The purpose of this was to confirm that the unloader relieved all of the pressure in the compressor - not just in the head. Fortunately, even the lower section (crank case) of the compressor is relieved by the unloader, so there was no need for another vent.
If you do not already have an unloader built into your pressure switch, Grainger has a check valve that has an automatic unloader with no need to plumb the pressure switch unloader with the receiver check valve. I wish I had known about this when I built my system. The part is called the "Load Genie Unloader" and you can try part #5A705. This may not be the exact part number you need for your applications but it will get you in the ballpark. And that's all there is to it. Happy wheeling! Follow Up:
|
|||||||||||||||||

|
Help spread the ROCKCRAWLER world!
|