
Revolver Shackles
 Before
you begin this install, take the simple instructions out and read them
thoroughly. Look at the diagram of the shackle and the two-page instruction
sheet. The shackle can be used on all four corners with the orientation
of the shackle the same. The pivot should be orientated toward the center
of the vehicle.
Before
you begin this install, take the simple instructions out and read them
thoroughly. Look at the diagram of the shackle and the two-page instruction
sheet. The shackle can be used on all four corners with the orientation
of the shackle the same. The pivot should be orientated toward the center
of the vehicle.
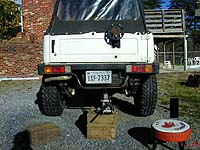
You will need a limited set of tools to get the shackles bolted on. The size and type will vary depending on what vehicle you're installing them on. Before you start the install process, you need to make sure you have a jack that is strong enough to get the vehicle in the air by placing the jack under the bumpers to let the axles droop freely. It doesn't matter what end you start on.
I started in the rear because that is where I anticipated the troubleshooting. Most of your time will be taken on seeing whether or not you will have to get longer brake lines and whether or not your shocks will need to be replaced. The instructions are very simple, because your install will be very simple. They are not specific to any vehicle and do not need to be. The process is the same, no matter what vehicle you are doing the install on. If you can't get a question about the install answered in the review then please call Curt or e-mail him with your question.
This is where the install begins. Jack up the rear of the vehicle at the bumper or any solid point you have available. Get the tires to where they are barely off of the ground. Place a set of jack stands under the frame on both sides. Block the front of the vehicle. Unbolt the existing shackles from the frame mount and get a set of replacement lock nuts and bolts if necessary. Mine were already new so they were not needed but for the price of buying new bolts and lock nuts you should replace the old ones.
 When
you get the old shackle out of the frame mount, you may end up fighting
with the shackle to get it off the spring pack eye. I've heard of a ton
of tricks to make this happen and don't believe there is any better way
of doing it. I've heard of folks burning out the old bushing and cutting
the bolts loose by getting an air hammer and putting it to work. You can
help yourself out by drenching your old shackles and frame mounts with
a solvent like WD-40 or a penetrating spray a day or so before you plan
the install.
When
you get the old shackle out of the frame mount, you may end up fighting
with the shackle to get it off the spring pack eye. I've heard of a ton
of tricks to make this happen and don't believe there is any better way
of doing it. I've heard of folks burning out the old bushing and cutting
the bolts loose by getting an air hammer and putting it to work. You can
help yourself out by drenching your old shackles and frame mounts with
a solvent like WD-40 or a penetrating spray a day or so before you plan
the install.
At this point, you need to make a decision on what to do with your old bushings. If they are re-usable, it's ok to do so but Curt recommends replacing the bushings with urethane. You may want to take it a step further and get a greasable setup for the frame and shackle mount. A grease pin with a zirc fitting will alleviate any strain or resistance the shackle will have while moving freely in the frame mount and at the pivot of the shackle.
I asked Curt about a greasable setup for the center pivoting point on the shackle and he said it wasn't necessary because it was packed with marine grease from the finisher. The two-year test run on the shackles showed no benefit in the operation of the shackle having it set up as a greasable bushing. The same thing also held true for the spring eye mount.
Since I already had the grease pins and new urethane bushings set up for grease, I used them on the frame mount and spring eye mount. I decided to leave the center pivoting point alone after asking Curt about it.