|
|
|||||||||||||
|
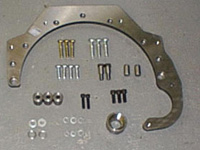
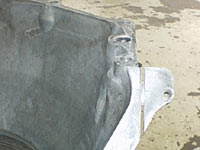
A hole must be drilled in the factory dust cover that fits between the block and transmission to allow you to access the torque converter bolts. The GM transmission case must also be cut slightly and two of the bell housing bolt holes must be elongated to fit the adapter plate. The nice thing about this is that the necessary modifications are very easy to do and do not require any special tools. I mounted the plate onto the engine and then mounted the empty transmission case to it so it was easier to make the necessary modifications. This is also a good idea because you can thoroughly clean out any filings that make it into the case from the grinding and cutting that must be done.
I looked into it a little and found out that the starter for an `83 CJ-7, which was the donor vehicle for my crankshaft, had a long throw. I bolted it up to the adapter plate and it lined up perfectly. This did present some other problems, though. The stock starter for my Jeep had a solenoid integrated into it, while the `83 CJ starter did not. This was easily remedied by adding an external solenoid and a little extra wiring. Once this was sorted out, I had successfully mated the GM transmission to the Jeep engine. All this is not without a catch, though. Jeep puts the crankshaft position sensor (CPS), necessary for ignition and injection timing, on the bellhousing of the stock transmission. It reads the crankshaft position off of the flywheel so the computer knows when to open the injectors for each cylinder and when to fire each spark plug. The problem with the new transmission is that there is no provision for this sensor. Advance Adapters came to the rescue once again with their CPS relocation kit (AA part#716012). This kit relocates the CPS to the front of the engine where it reads the necessary information off of a specially-machined harmonic balancer included in the kit.
This is where I had the most trouble of the entire swap. The three little wires that go into the CPS plug do not directly correspond to the 3 little prongs on the opposite side. This little oversight on my part when I extended the harness led to me getting to practice my diagnosis skills. 8 hours of practice later, my Jeep was running again. The only problem I have had with this kit is throwing belts. Make sure your belt is in good shape, because if you lose a belt, it will most likely tear the CPS right off of the relocation bracket. Without the CPS in place, the engine will not run. The other thing that is more of an inconvenience than anything, is that the sensor must be removed and readjusted when the belt is replaced. This is not a big deal, but it does make what used to be a simple job kind of a pain.
Headache
#3 The inputs that it requires are a kickdown cable and 12 volts for the torque converter lock up solenoid. These minimal requirements are another plus of the 700R4 when it comes to a swap like this. The kickdown cable for the 700R4 is necessary for proper operation of the transmission. It tells the transmission what the throttle position of the engine is. This allows the transmission to adjust its shift timing, shift firmness, and passing gear as necessary. Jeep made this part of the swap easy. The throttle cable bracket on the 4.0L has provisions for 3 cables running through it. One is for the throttle cable, one is for cruise control, and the third is for a kickdown cable. As luck would have it, Jeep uses the same style of kickdown cable and linkage on the throttle plate lever as GM. This means plug and play. Advance Apapters part #716138-KD is actually a GM kickdown cable that plugs right in to the factory bracket and hooks up to the stock throttle linkage. The other input that the 700R4 needs is 12 volts for the torque converter lockup solenoid. A lockup torque converter works like a clutch for a manual transmission in certain situations. This means that when you are cruising down the highway at a steady speed, the torque converter will lock up. The inherent slippage in a torque converter leads to slightly higher RPM when cruising which means more fuel burned. When the converter locks up, there is a 1:1 ratio between the crankshaft and the input shaft of the transmission and that equals better efficiency. The 12 volts that the transmission sees cannot be there at all times however or the converter would lock up as soon as the transmission shifted into fourth and would stay locked up until the transmission down shifted.
The transmission is the final step in the process, which will only allow lockup if the transmission is in 4th gear. All this adds up to lockup only when the brakes are not on, the throttle is at a relatively closed position, and the transmission is in 4th gear. Confused yet? The end result is a lower cruising RPM on the highway, which is designed to improve fuel mileage. This is also a very important because if the transmission is in 4th, the 30% overdrive planetary gears produce a lot of heat. An unlocked converter also produces a lot of heat. Because the engine is turning so slowly when the transmission is in 4th, the fluid flow through the cooler in also very low. The cooler is able to overcome the heat produced by one or the other but has difficulty dissipating the heat produced by both. This heat can lead to premature failure and an angry Jeeper. The one universal truth about automatic transmissions is that they produce a lot of heat. This heat must be dissipated somewhere and typically in a stock installation, a heat exchanger, or cooler, is located it the radiator. Because YJ’s were available with an automatic, a stock radiator is available with a cooler in it. I don’t think Jeep installed radiators with transmission coolers in all YJ’s, but mine had one so I flushed it out and threaded some fittings into it. I bought some 5/16” cooler line and bent it as necessary to direct the flow from the transmission to the cooler and back again. I was very careful to route the lines so that they did not rub against anything that may wear a hole in them. I also wrapped them in rubber hose where I zip-tied them together for the same reason. Fluid is the life blood of an automatic, so I’d hate to lose it because a cooler line wasn’t adequately protected. Headache
#4 The AX-15 has a length of 24”. The 700R4 that I replace it with has a length of 23 3/8”. Then the adapter plate must be added which was 5/8” and the transfer case adapter is another 1 ½”. This adds up to 25 ½” or 1 ½” longer than the stock transmission. I was a little concerned about the rear shaft length because I am running a lot of lift (4.5”) and plans for a belly up skid plate are in the works. I already had a home-made 1” motor lift installed in preparation for the belly up, so I did some more homebrew engineering and decided to move my engine forward 1” in conjunction with the motor lift. This was actually very easy to do with some 2”X1” tubing and a little time. This was purely experimental but I figured it was an easy way to relocate the engine and it worked out very well. This gave me back 1” of rear driveshaft with minimal effort. However, I wanted more. I always thought more wheelbase would be nice so I thought I’d do some more experimenting for the sake of the Jeeping community. I modified the wedges for the pinion angle on the rear axle to move the rear axle back 1”. Once again, my homebrew engineering or dumb luck, one or the other, worked out pretty well. The rear differential cover rubs the gas tank skidplate slightly when the suspension compresses, the parking brake cables are a little stretched out, and the rear of the fenderwells need a little more trimming, but these are the only issues I have found. I want to reiterate that I don’t think the engine and axle relocations are necessary to put this automatic into my Jeep. I just did them for experiment’s sake and to make future modifications that I have planned work well with the new transmission. The net result of all of this worked out quite well for me. I thought for sure that I was going to need new shafts front and rear because of the difference in length of the transmission. The engine relocation moved the entire drivetrain forward 1”, while the transmission is 1 ½” longer. The result was that my transfer case was ½” further back than stock which would add ½” to the front shaft length. The rear axle was moved back 1” which means I actually gained ½” of rear driveshaft as well. This difference is minimal as far as the driveshafts were concerned, so I bolted the old ones back in and they have been working fine. The drivetrain all fit together pretty well. It wasn’t terribly difficult to make it fit in the Jeep, either. One thing I was not counting on was problems with my exhaust system, though. When I was test-fitting the empty transmission case, I realized that the exhaust was not going to clear the right side of the case. My exhaust is far from stock, being rerouted for rock clearance and bigger tubing for better flow. With this is mind, I can’t say for sure if a stock exhaust would interfere, but I believe that it would present the same problem. The solution for me was to cut out the offending section and have an exhaust shop replace it after everything else was installed.
The installation was a little difficult because the Lokar is designed for a two-wheel drive transmission and the transfer case adapter interferes with the location that Lokar intended their shifter to bolt to. More homebrew engineering on my part was done, and I had it sorted out. The holes that the shifter is supposed to bolt to are open on the front of the transmission flange, so I installed some bolts from the front side and put the bracket on backwards. I also had to trim the back of the shifter bracket slightly so I could install the nuts that hold the transfer case onto the adapter. This was not the end of it, though. The transfer case shifter bracket had to be notched to clear the transmission shifter, as well. All in all, the Lokar shifter works well. The one thing that I don’t like about it is the lack of definition between gears. On the trail, it can be difficult to tell what gear has been selected. It is also difficult to shift between gears quickly sometimes because the gates between gears can be confusing as to when the button on top must be pushed and when to release it. For everyday driving, this shifter works very well, though. The stock transfer case shifter, mounted on its aftermarket perch, comes up through the floor very close to the stock location. It is closer in my case because I moved my engine forward 1” but even if I hadn’t, the floor wouldn’t have needed much more trimming than I had to do. The Advance Adapters bracket for the transfer case shifter angles it toward the left slightly but not enough to be a problem. This leaning of the shifter is the only reason I had to trim the floor at all. The Lokar shifter comes up through the floor about six inches forward of where the manual shifter came through. For this reason, the stock tunnel cover cannot be reused. I made a new one out of sheet metal and was planning on buying some universal shift boots to cover the holes. Then I remembered that I had the front half of a stock TJ console in my garage. After a little test fitting, Dremel work, and more homebrew engineering, I got the TJ console to fit. I visited my local Jeep dealer for a boot and it looks like it is supposed to be there and I now have a usable cup holder. Anti-Shift
Off-road, it’s even better. I usually don’t have to get over 1,000 RPM on the trail. The combination of the low-end torque of the engine and the low stall torque converter makes my rig crawl very well. This is one of the common misconceptions about automatics. With a 3.06:1 first gear, 2.72:1 low range, and 4.10’s in the axles, I have a mechanical crawl ratio of 34.13:1. The thing that most people don’t think about is the torque converter, which can hydraulically multiply torque by as much as a factor of 2. If you bring this into the equation, this brings the crawl ratio down to a slow 68.25:1. This is great for crawling and climbing, but not low enough for me for two reasons. The engine braking when descending is not great - acceptable, but not as good as my manual. The other problem is cruising on the highway. With the .70:1 overdrive, 4.10’s and 35’s, my engine is only turning 1650 RPM at 60 MPH, which is below the power band. These two issues have me seriously looking at 4.88’s. 4.88’s will allow better crawling off-road and put the Jeep into the power band at highway speeds. This brings
up one last issue. Automatics require good brakes - really good
brakes. It definitely takes a lot of brake to keep my rig still
when I am waiting for an obstacle in low range with the transmission
in gear. I am hesitant to gear my rig any lower without upgrading
the brakes first. Other than these small issues, I am very pleased
with the swap. It makes my rig more daily-driver friendly and
still shines on the trail.
|
|||||||||||||
 Headache
#1
Headache
#1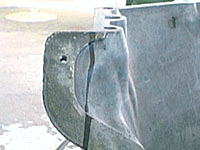
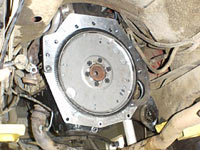
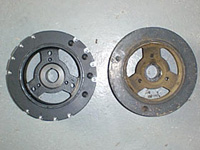
 One
of the few things specific to any Jeep engine when making a swap
like this is the flywheel. The flywheel must be balanced to the
crankshaft on any engine. My engine uses a 4.0L block but I have
a crankshaft out of an `83 258 to increase the stroke and therefore
the displacement of the engine (read about it). Because of this,
I have to use the flywheel for the `83 258 (AA part #716138B)
rather than the one for a 4.0L. I didn’t think that this
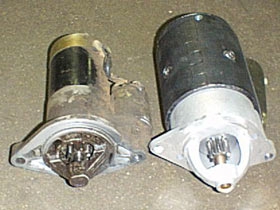
would present any issues until I bolted on the starter. The instructions
for the adapter plate discuss starter throw depth. It turns out
that Jeep uses two different starter throws depending on the engine.
If your engine is stock, you shouldn’t have to worry about
this. Because mine is modified, I had a starter with a short starter
throw while the `83 258 crankshaft and flywheel require a starter
with a long throw. Fortunately, all starters for Jeep engines
mount to the bellhousing the same way.
One
of the few things specific to any Jeep engine when making a swap
like this is the flywheel. The flywheel must be balanced to the
crankshaft on any engine. My engine uses a 4.0L block but I have
a crankshaft out of an `83 258 to increase the stroke and therefore
the displacement of the engine (read about it). Because of this,
I have to use the flywheel for the `83 258 (AA part #716138B)
rather than the one for a 4.0L. I didn’t think that this
would present any issues until I bolted on the starter. The instructions
for the adapter plate discuss starter throw depth. It turns out
that Jeep uses two different starter throws depending on the engine.
If your engine is stock, you shouldn’t have to worry about
this. Because mine is modified, I had a starter with a short starter
throw while the `83 258 crankshaft and flywheel require a starter
with a long throw. Fortunately, all starters for Jeep engines
mount to the bellhousing the same way. 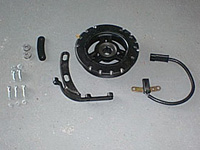
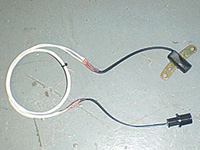 The
kit consists of a new sensor, a machined harmonic balancer, sensor
bracket, and necessary hardware. The new sensor’s harness
must be cut and extended to reach its new perch on the front of
the engine.
The
kit consists of a new sensor, a machined harmonic balancer, sensor
bracket, and necessary hardware. The new sensor’s harness
must be cut and extended to reach its new perch on the front of
the engine.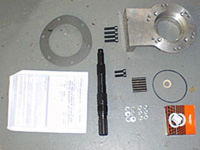 Headache
#2
Headache
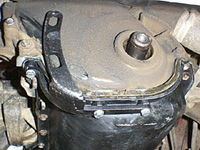
#2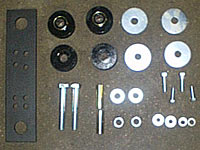 I
would highly recommend having the output shaft installed by a
professional transmission rebuilder. It is not something that
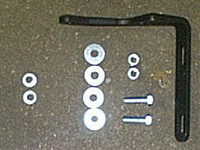
you want to do in your garage. The adapter housing also includes
a foot to bolt a mount to. You could modify a factory mount to
fit here or use the Advance Adapters part #716008 that is designed
to work with the adapter housing. This kit makes it very easy
to bolt the adapted drivetrain to the stock crossmember/skidplate.
I
would highly recommend having the output shaft installed by a
professional transmission rebuilder. It is not something that
you want to do in your garage. The adapter housing also includes
a foot to bolt a mount to. You could modify a factory mount to
fit here or use the Advance Adapters part #716008 that is designed
to work with the adapter housing. This kit makes it very easy
to bolt the adapted drivetrain to the stock crossmember/skidplate.
 The
other issue that is encountered when adapting the Jeep transfer
case to just about any transmission is what to do with the shifter.
The stock Jeep transfer case shifter bolts to the shift tower
on the AX-15 transmission. This shift tower left with the stock
unit, leaving nothing for the transfer case shifter to bolt to.
Advance Adapters has another well-thought-out kit to remedy this.
Part #715523 is a kit that allows you to retain the stock transfer
case shifter in nearly the stock location. This minimizes the
floorboard modifications that are necessary.
The
other issue that is encountered when adapting the Jeep transfer
case to just about any transmission is what to do with the shifter.
The stock Jeep transfer case shifter bolts to the shift tower
on the AX-15 transmission. This shift tower left with the stock
unit, leaving nothing for the transfer case shifter to bolt to.
Advance Adapters has another well-thought-out kit to remedy this.
Part #715523 is a kit that allows you to retain the stock transfer
case shifter in nearly the stock location. This minimizes the
floorboard modifications that are necessary.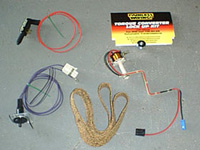 The
solution to this is a lockup bypass kit (AA part #24-60109). This
kit consists of a brake switch, a vacuum switch, wiring harness,
and a new transmission lockup solenoid and harness. When I had
the unit apart to install the Advance Adapters output shaft, I
also installed the new harness. The kit calls for 12 volts to
run through the brake switch, to the vacuum switch, and then to
the transmission. The brake switch opens when the brakes are applied
to unlock the converter. The vacuum switch is open when the manifold
vacuum is low, such as mid to high throttle positions, and closes
with high manifold vacuum, such as when cruising.
The
solution to this is a lockup bypass kit (AA part #24-60109). This
kit consists of a brake switch, a vacuum switch, wiring harness,
and a new transmission lockup solenoid and harness. When I had
the unit apart to install the Advance Adapters output shaft, I
also installed the new harness. The kit calls for 12 volts to
run through the brake switch, to the vacuum switch, and then to
the transmission. The brake switch opens when the brakes are applied
to unlock the converter. The vacuum switch is open when the manifold
vacuum is low, such as mid to high throttle positions, and closes
with high manifold vacuum, such as when cruising. 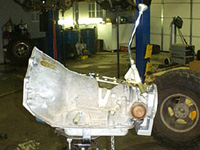 Headache
#5
Headache
#5
|
Help spread the ROCKCRAWLER world!
|