If you're anything like me, you only want to put the strongest and most functional aftermarket modifications on your truck, but when you can't afford the strongest and most functional modification, compromises have to be made. No longer are you looking for simply the strongest and most functional... now you are looking for the modification that provides the most bang-per-buck.
Well, it came time to finally put a locker in my good old Jeep TJ. First, I decided I wanted to shoot for ARB lockers, front and rear. The ARB air-locker is one of the most popular heavy-duty lockers because of its ability to engage and disengage at the press of a button. You can't beat that! Who was I kidding? ARB lockers front and rear, and the necessary air-compressor can cost up to a couple thousand dollars, installed. Needless to say, that didn't fit in my budget. :)
My next decision was to put a Detroit C-Locker in the rear differential. I had experience running Detroit lockers before in other vehicles, and their performance was very pleasing. Although one is unable to completely disengage the Detroit locker, its strength and off-road performance is exceptional, and street manners are tolerable. Once again, the locker is expensive and labor-intensive to install. To put one in would cost just less than a thousand dollars (parts and labor), and once again, this was too expensive.
I considered a Lock Right, which we'll be discussing throughout this article, but I've never been satisfied with the manners or durability of the unit. The Lock Right is an inexpensive spider-gear replacement that easily installs in your existing carrier. The unit usually proves very effective, but putting 33,000 miles on my Jeep in less than a year made me hesitate installing the unit. For approximately $275 (price dependent on kind of rear) and simple installation, many weekend 'wheelers can't go wrong with it.
 |
I was waiting for a miracle locker. One that would smoothly allow my Jeep to scale walls out on the trail, and yet one that would magically disappear as soon as I pulled out onto the pavement. This seemed particularly naive, but I dreamt it, nonetheless. I had high hopes during the introduction of the relatively inexpensive Detroit Gearless locker, but these hopes were quickly squelched due to horror stories of a weak unit that had a high failure rate. |
 |
Not long after the rise and fall of the Detroit Gearless locker, the Powertrax No-Slip entered the scene. Was this the miracle locker I was looking for? Powertrax, the company that manufactures the Lock-Right, started production of the Powertrax No-Slip which is also a spider gear replacement locker. It seemed funny that one company would produce two very similar lockers of two entirely different names. I did a little research and decided to give this new locker a try. |
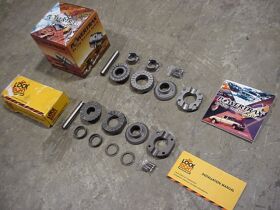 |
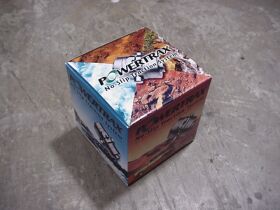
The Powertrax Lock-Right, as I mentioned before, cost approximately $275 for my vehicle, while the Powertrax No-Slip cost approximately $375 for the same application. Either locker fit my budget. All I had to do was figure out what made the Powertrax No-Slip better than the Powertrax Lock Right. In the picture to the left, you can see the packaging, instructions, and dissassembled lockers side-by-side. Both lockers pictured are for Dana 35c axles. |
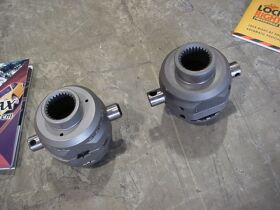 |
As you can see, they are very similar, and nearly indistinguishable to the untrained eye. What I established from the advertising and talking to Powertrax was that both lockers performed similarly on the trail, however the Powertrax No-Slip is minimally stronger and smoother operating than the Lock Right. Lock Right units typically make a ratcheting sounds (series of clicking) when turning corners on the pavement, and this characteristic was supposedly eliminated in the No-Slip unit. |
 |
Spider gear replacement lockers are only as strong as the carrier they are in. The carrier, as you can see in the picture, houses the spider gears which allow speed to vary from one wheel to another around bends and so on. When you're four-wheeling, traction goes from the wheels that grip, to the wheels that slip, so if your suspension is flexed out and one wheel on each axle lift from the ground, you will usually stop dead in your tracks. The "locker" locks up both wheels on one axle so there is no loss of traction, and you can proceed unhindered. Vehicles equipped with lockers are usually significantly more capable than those without in most conditions. |
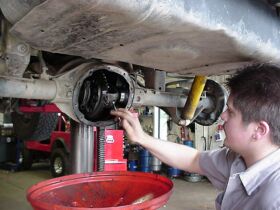 |
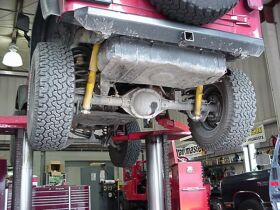
Taking off the differential cover and disposing or containing the gear oil are your first steps to putting a new locker in. If the inside of your differential is dirty, it probably wouldn't hurt spray the inside with brake cleaner, and stick an old rag in there to soak it up. (don't inhale) Here, you can see Jeremy at OK Auto, 4WD & Tire unscrewing the fastener that holds in the center-pin, which in turn, holds in the spider gears. |
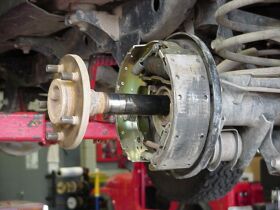 |
If you're running a Dana 35c (disposable) axle, pull off your c-clips, slide the axle out a little bit and the spider side-gears inside the carrier should fall right out. When that is all done, you're pretty much ready to put the new locker in! This was done in a 4x4 shop for the sake of documenting the installation, but this can easily be done in your driveway or on the trail with simple tools. Just make sure you have gear oil and containers. |